Migrate Your Website to Cloud Hosting: 2025 Guide
Migrating your website to cloud hosting can seem daunting, but with proper planning and execution, the process is straightforward and risk-free.
Hasan Wazid

Cloud hosting offers significant advantages over traditional hosting solutions including better scalability, improved reliability, enhanced performance, and flexible resource allocation. As websites grow and traffic patt...
Too long? Ask AI to summarize
Get a quick summary of this article using your favorite AI assistant
Introduction
Cloud hosting offers better scalability, reliability, and performance than traditional hosting. This guide walks you through migrating your website safely and efficiently.
Why Move to Cloud Hosting?
Cloud infrastructure handles traffic spikes better. It scales resources automatically. Your site stays online during high demand. You pay only for what you use.
Traditional hosting limits growth. Cloud hosting adapts to your needs. It provides better disaster recovery. Downtime decreases significantly.
Pre-Migration Planning
Document Your Current Setup
List everything before starting:
Website files (total size and count)
Databases (MySQL, PostgreSQL types)
Email accounts and storage
DNS records and nameservers
SSL certificates
Third-party integrations
Custom server configurations
Record current performance metrics. You'll compare them later. Track page speeds, response times, and traffic patterns.
Choose Your Cloud Provider
Select based on your needs:
For WordPress Sites:
Kinsta (premium managed)
WP Engine (enterprise)
Cloudways (managed platform)
SiteGround Cloud (balanced)
For General Applications:
AWS (enterprise scale)
Google Cloud (AI integration)
DigitalOcean (developer-friendly)
Vultr (affordable)
Linode (reliable)
Consider server locations near your audience. Check pricing transparency. Verify automatic scaling options. Review backup features and support quality.
Learn more at Learn more about best cloud hosting platforms for WordPress
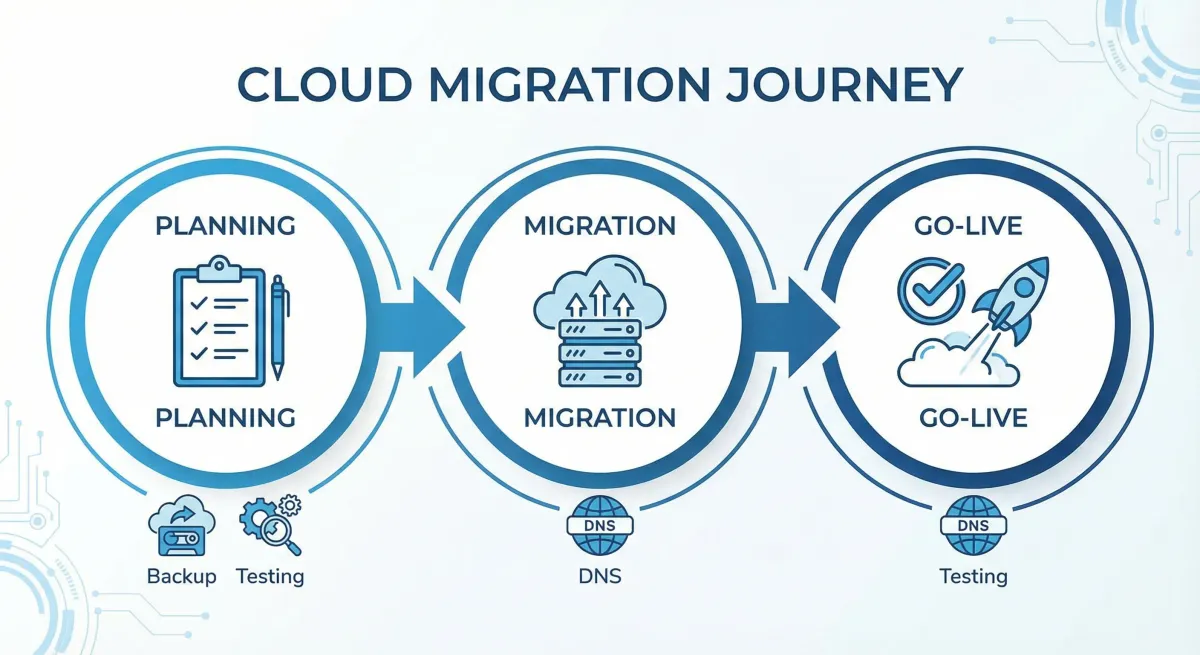
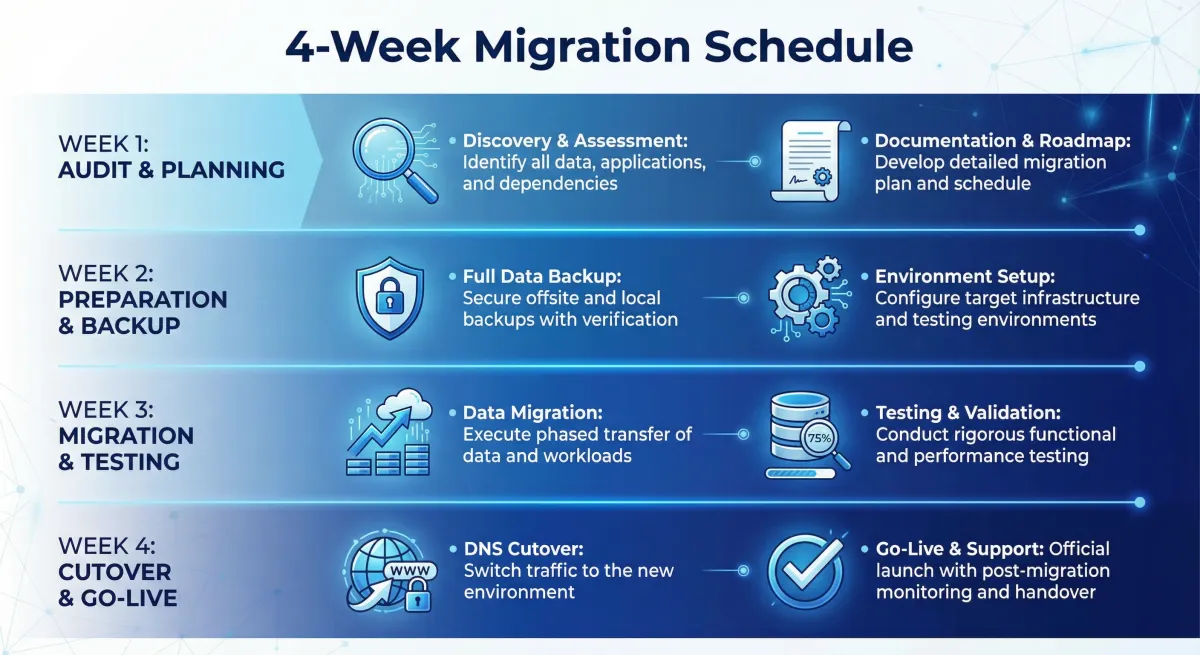
Create Your Timeline
Week 1 - Planning: Document setup, choose provider, create checklist
Week 2 - Preparation: Create backups, configure new environment, test setup
Week 3 - Migration: Upload files, import databases, test thoroughly
Week 4 - Go-Live: Update DNS, monitor propagation, verify functionality
Creating Complete Backups
Never skip backups. They're your safety net. Multiple backup methods ensure security.
What to Backup
Website Files: All HTML, CSS, JavaScript, images, videos, plugins, themes, and configuration files
Databases: Complete exports with user accounts, permissions, structure, and data
Email Data: Account configurations, messages, folders, and filters
DNS Records: Current configuration including A, CNAME, MX, and TXT records
Backup Methods
Method 1: Control Panel Backup
Log into cPanel or Plesk. Navigate to the backup section. Select full backup. Download to your computer. Verify the file downloaded completely.
Easy and comprehensive. Works for most sites. May timeout on very large sites.
Method 2: FTP/SFTP Download
Install FileZilla or Cyberduck. Connect to your server. Navigate to public_html or www folder. Download all files. Verify completion.
Reliable for large sites. Resume capability available. Requires separate database backup.
Method 3: Database Export
Access phpMyAdmin in your control panel. Select your database. Click Export tab. Choose SQL format. Download the file.
Creates clean, portable database exports. Must backup files separately.
Method 4: WordPress Plugin Backup
Install a backup plugin:
UpdraftPlus (free, cloud integration)
Duplicator (complete packages)
All-in-One WP Migration (easy interface)
Run full backup. Download files. Store in multiple locations.
Verify Your Backups
Check file sizes match. Open database exports without errors. Test restoration locally if possible. Store copies in three places:
Local computer
Cloud storage (Google Drive, Dropbox)
External hard drive
Setting Up Cloud Environment
Initial Server Setup
For Managed Hosting:
Select your plan. Choose data center location. Configure automatic backups. Complete the setup wizard. Most software comes pre-installed.
For Unmanaged Cloud:
Choose instance type. Select operating system (Ubuntu recommended). Pick datacenter region. Add SSH keys. Configure firewall rules. Launch instance.
Configure Server Software
Install web server (Apache, Nginx, or LiteSpeed). Install required software:
PHP (match your version)
MySQL or MariaDB
SSL/TLS support
Required PHP extensions
Caching systems (Redis, Memcached)
Managed hosting handles this automatically. Just verify correct versions.
Create Database
Access database management. Create new database. Create database user. Assign strong password. Grant all privileges. Save credentials securely.
Use different credentials than old hosting. This improves security.
Setup Testing Access
Create temporary access before DNS change:
Hosts File Method: Edit your computer's hosts file. Add new server IP with your domain. Test locally without affecting live site.
Subdomain Method: Create staging.yourdomain.com pointing to new server. Test publicly without changing main domain.
Temporary URL: Use provider's temporary domain like server123.host.com or yourdomain.tempurl.com.
Migrating Your Website
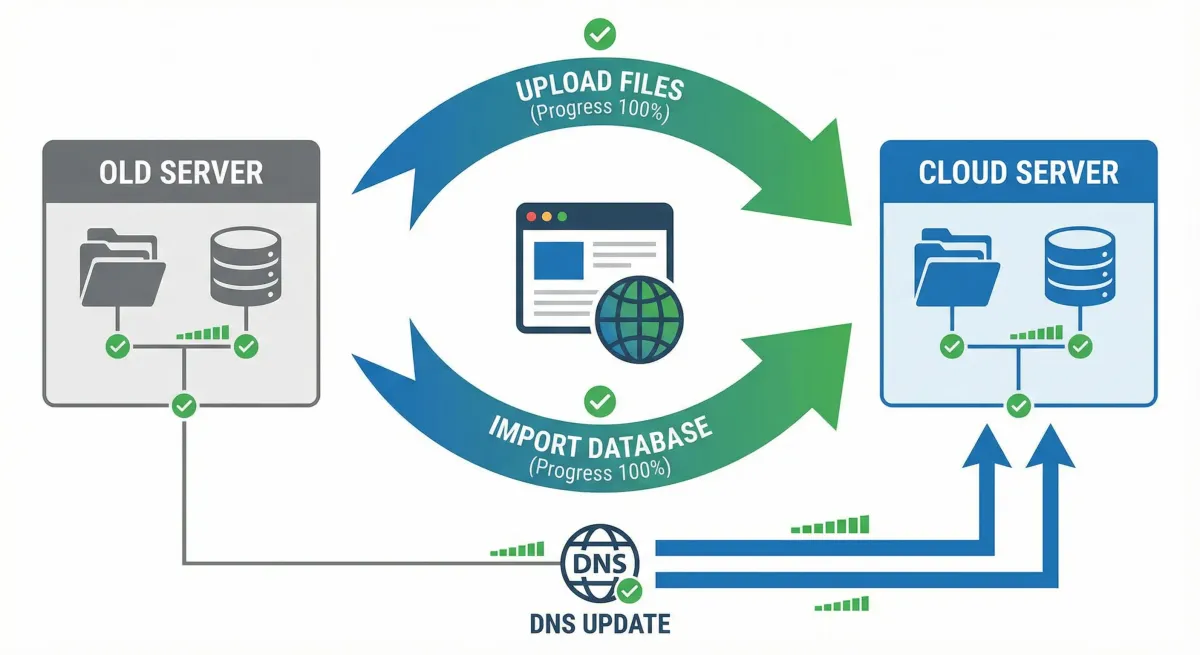
Upload Website Files
FTP/SFTP Upload:
Connect FTP client to new server. Navigate to web root (public_html, www). Upload all files maintaining structure. Verify completion. Check permissions (755 folders, 644 files).
Upload during low-traffic hours. Monitor progress. Verify file counts match original.
cPanel Backup Restoration:
Upload backup file to new hosting. Access new cPanel. Navigate to backup restoration. Select backup file. Start process. Verify restored content.
Both old and new hosting must use cPanel.
WordPress Plugin Migration:
Install migration plugin on old site. Export site. Download package. Install WordPress on new hosting. Install same plugin. Import package. Verify functionality.
Import Database
Access phpMyAdmin on new hosting. Select newly created database. Ensure database is empty. Check character encoding (UTF-8 recommended).
Click Import tab. Choose SQL file. Verify format settings. Click Go to import. Wait for completion.
Verify table count matches. Check data in key tables. Confirm character encoding correct.
For Large Databases (500MB+): Split SQL file into parts. Use command line import. Increase upload limits. Use provider's import tools.
Update Configuration Files
WordPress:
Edit wp-config.php with new database credentials:
define('DB_NAME', 'new_database_name');
define('DB_USER', 'new_database_user');
define('DB_PASSWORD', 'new_database_password');
define('DB_HOST', 'localhost');
Update site URLs using Search-Replace-DB script, WP-CLI, database update, or Better Search Replace plugin.
Other Platforms:
Joomla: Update configuration.php
Drupal: Update settings.php
Custom sites: Update config files
Check for hardcoded file paths. Update them in configuration files, database entries, and custom scripts.
Testing Before Go-Live
Test using temporary URL or hosts file modification.
Core Testing Checklist
Homepage Testing:
Loads correctly
Logo and images display
Navigation works
Layout appears correct
No broken elements
Functionality Testing:
Internal links work
Search operates
Contact forms submit
User login functions
Shopping cart works (if applicable)
Payment processing (test mode)
Content Verification:
All pages load
Blog posts display
Images and media load
Videos play
Downloads work
Database Functionality:
Dynamic content loads
Database queries execute
User data accessible
Comments display
Mobile Testing:
Displays on mobile devices
Touch functionality works
Mobile menu operates
Forms submit properly
Performance Testing:
Page loading speed acceptable
Server response times good
Database queries efficient
Caching works properly
Fix Common Issues
Broken Images: Check file permissions (644). Verify image paths. Update URLs in database. Clear browser cache.
Database Errors: Double-check credentials. Verify database host. Confirm user privileges. Test connection separately.
White Screen/500 Errors: Check error logs. Verify permissions. Test .htaccess rules. Confirm PHP compatibility. Disable plugins temporarily.
SSL Issues: Install SSL certificate. Update URLs to HTTPS. Configure SSL redirect. Clear browser SSL cache.
Read more at Hosting Comparison Guide
DNS Migration and Go-Live
Prepare for DNS Switch (24-48 hours before)
Lower TTL Values: Reduce DNS Time-To-Live to 300-600 seconds. This speeds propagation. Login to domain registrar. Change TTL for all records. Wait for old TTL to expire.
Final Synchronization: Create final backup of old hosting. Upload recent changes to new hosting. Verify new hosting ready. Test all functionality again.
Prepare Monitoring: Set up uptime monitoring (Pingdom, UptimeRobot). Prepare analytics comparison. Clear schedule for monitoring.
Update DNS Records
Document Current DNS: Save all A, CNAME, MX, TXT, and custom records before changing anything.
Update A Records: Login to domain registrar. Access DNS management. Update A record for @ (root). Update A record for www. Point to new cloud IP. Save changes.
Example:
Type: A
Host: @
Points to: 123.45.67.89
TTL: 300
Update Other Records: Keep MX records unchanged (email). Update subdomain records. Verify TXT records copied. Maintain CNAME records.
Verify Changes: Use whatsmydns.net to check propagation. Test from multiple locations. Use command line: nslookup yourdomain.com.
DNS Propagation Period
Propagation starts immediately. Completes within 4-48 hours. Faster with lower TTL values. Varies by location and ISP.
During propagation, some visitors see old site. Others see new site. This is normal. Keep both hostings active.
Monitor analytics traffic. Watch for error reports. Test from different locations. Use VPN to check different regions.
Post-Migration Checklist
Immediately After DNS Switch:
Clear CDN cache
Test from multiple devices
Verify SSL working
Check email functionality
Monitor server performance
Watch error logs
Test forms and transactions
First 24 Hours: Monitor uptime continuously. Compare analytics traffic. Check search console. Verify backups running. Test critical functionality. Address user reports.
First Week: Keep old hosting active. Monitor for issues. Optimize performance. Update external links. Submit sitemap. Verify integrations working.
After 2 Weeks: Cancel old hosting after confirming everything works. Restore normal TTL values. Complete performance optimization. Update documentation.
Post-Migration Optimization
Performance Improvements
Configure Caching: Enable server-level caching. Set browser caching headers. Configure CDN if available. Implement object caching (Redis, Memcached).
Enable Compression: Activate Gzip compression. Optimize images. Minify CSS and JavaScript. Use lazy loading for images.
Database Optimization: Optimize database tables. Remove unnecessary data. Add database indexes. Configure query caching.
Security Hardening: Configure firewall rules. Enable DDoS protection. Set up automatic backups. Implement security monitoring. Enable two-factor authentication.
Troubleshooting Post-Migration Issues
Email Not Working: Verify MX records correct. Check DNS propagation complete. Test SMTP settings. Check spam folders. Wait for propagation completion.
Slow Performance: Enable caching systems. Optimize database queries. Check server resources. Implement CDN. Optimize images. Review plugin efficiency.
SSL Certificate Errors: Verify SSL installed correctly. Force HTTPS redirect. Update internal links. Clear browser cache. Check mixed content. Renew expired certificates.
404 Errors: Check .htaccess rules. Verify permalinks (WordPress). Update file paths. Check redirect rules. Confirm files uploaded.
Common Mistakes to Avoid
1. Skipping Complete Backups
Many skip comprehensive backups. They assume everything will work perfectly. Migration can fail unexpectedly. Without backups, recovery is impossible.
Create multiple complete backups. Include files, databases, and configurations. Verify backups work before starting. Store copies in multiple locations. Never proceed without verified backups.
2. Not Testing Before DNS Change
Some update DNS immediately after uploading files. They discover critical issues when visitors arrive. Broken forms, missing data, and errors frustrate users.
Use temporary URLs for thorough testing. Check all functionality, forms, and transactions. Test from different devices and browsers. Verify everything works perfectly. Only update DNS when 100% ready.
3. Changing DNS Too Early
Rushing DNS updates causes downtime. The new hosting isn't fully configured. Visitors encounter errors and broken pages. This damages reputation and SEO.
Complete all setup first. Upload files, import databases, and configure settings. Test comprehensively using temporary access. Verify everything works perfectly. Update DNS only when completely ready.
4. Canceling Old Hosting Immediately
Some cancel old hosting right after DNS update. Issues might appear days later. Without old hosting, restoration is impossible. You lose your safety net.
Keep old hosting active for minimum 2 weeks. This provides fallback option if needed. Allows time to catch delayed issues. Gives peace of mind during transition. Only cancel after confirming everything works perfectly.
5. Ignoring DNS Propagation
Many assume DNS changes are instant. They panic when some users see old site. Others see new site at same time. This confusion leads to premature troubleshooting.
Understand DNS propagation takes 4-48 hours. Keep both hostings active during this period. Monitor propagation progress globally. Don't make changes during propagation. Wait for completion before troubleshooting.
Frequently Asked Questions
How long does website migration take?
Complete migration typically takes 2-4 weeks. Planning and preparation require 1-2 weeks. Actual file transfer and setup take several days. DNS propagation adds 1-2 days. Complex sites with custom features may need additional time. Simple sites can migrate faster with proper planning.
Will migration affect my SEO rankings?
Proper migration maintains SEO rankings. Keep same domain and URL structure. Set up 301 redirects for any changed URLs. Submit updated sitemap to search engines. Monitor Google Search Console for errors. Maintain same content and metadata. Most sites see no ranking impact with correct migration.
Can I migrate without downtime?
Yes, with proper planning. Use temporary URLs for setup and testing. Keep old hosting active during DNS propagation. Both sites run simultaneously during transition. Visitors experience no interruption. Only brief propagation period shows mixed results. This approach eliminates actual downtime.
What if something goes wrong during migration?
Your backups protect against problems. Restore from backup to old hosting if needed. Roll back DNS changes to previous settings. Contact new hosting provider support for assistance. Most issues are fixable without data loss. This is why complete backups are essential before starting.
Do I need technical skills to migrate my website?
Basic technical knowledge helps but isn't mandatory. Control panel tools simplify most tasks. Many hosts offer free migration assistance. WordPress migration plugins automate the process. Following step-by-step guides reduces complexity. For complex sites, consider hiring migration experts. Most users successfully migrate with careful preparation.
Conclusion
Migrating to cloud hosting improves performance, scalability, and reliability. The process requires careful planning and attention to detail. Following systematic steps ensures smooth transition with minimal risk.
Key success factors include thorough planning, complete backups, comprehensive testing, and careful DNS management. Keep old hosting active during transition. Monitor closely during and after propagation.
Cloud hosting benefits make migration worthwhile. Improved performance handles traffic better. Better scalability adapts to growth. Enhanced reliability keeps sites online. Flexible resources optimize costs.
Take your time with each step. Don't rush critical phases. Seek help from hosting provider when needed. Many offer migration assistance. With proper execution, your site will thrive on cloud infrastructure.
Frequently Asked Questions
Basic technical knowledge helps but isn't mandatory. Control panel tools simplify most tasks.
Never Miss an Update
Join thousands of readers getting the latest insights on technology, business, and digital marketing.